
 Components & Storage
 Software & Services


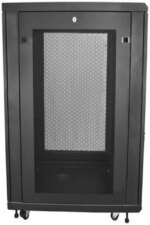

StarTech RK1833BKM StarTech.com Server Rack Cabinet – 18U – 31 in Deep Enclosure – Network Cabinet – Rack Enclosure Server Cabinet – Data Cabinet
$1,111.35
StarTech RK1833BKM StarTech.com Server Rack Cabinet – 18U – 31 in Deep Enclosure – Network Cabinet – Rack Enclosure Server Cabinet – Data Cabinet
| Best Seller Ranking |
#52 in Server Racks ,Cabinets |
|---|---|
| Brand |
StarTech.com |
| Model |
RK1833BKM |
| Type |
Rack Mount Cabinet |
| Rack Units |
18U |
| Color |
Black |
| Weight Capacity |
994.50 lbs. |
| Specification |
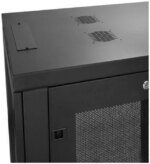
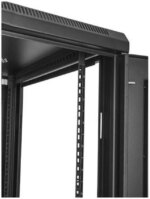
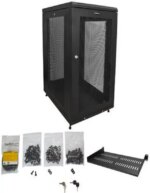
Back Door Construction: Steel MeshFront Door Construction: Steel MeshFront Door Key Lock: YesSide Panel Construction: Steel MeshCasters:IncludedFan (s): NoFrame Type: Enclosed CabinetRack Type: 4-PostWallmountable: NoExternal Depth: 33.6 in [853 mm]External Height: 35.6 in [903 mm]External Width: 23.6 in [600 mm]Maximum Mounting Depth: 30.7 in [780 mm]Minimum Mounting Depth: 3 in [76.2 mm] |
| Features |
Easy rack-mount equipment installationKeep your rack-mount equipment secure with lockable doorsKeep your equipment at an optimal temperature with passive coolingMount equipment at the top of the rack with a ceiling panel that features square venting holes that are cage nut compatibleFront and side mounting holes to accommodate different types of equipment1U shelf and hook-and-loop cable tie included |
| Industry Standard |
DIN41491 Part IEIA RS310-DIEC297-2 |
| Included Accessory |
1 x 10 ft. hook and loop1 x 1U fixed shelf1 x enclosure cabinet2 x door keys2 x side panel keys72 x cage nuts72 x mounting screws |
| Unit Dimension |
35.60" x 23.60" x 33.60" |
| Shipping Weight |
151.80 lbs. |
| First Listed on Newegg |
August 08 ,2017 |
12 reviews for StarTech RK1833BKM StarTech.com Server Rack Cabinet – 18U – 31 in Deep Enclosure – Network Cabinet – Rack Enclosure Server Cabinet – Data Cabinet


BRANNAN B. –
Pros: Although not as sleek as a Dell cabinet, these are great looking. Well made. Have good build materials. And a Lifetime warranty. The actual Rack Posts (4) are designed for use with the “universal” Cage Nuts and Screws (a bag of about 10-20 are included), which is very nice.
Setup is pretty simple for the technically inclined (takes about 2-3 hrs, if it’s your first one). Most of it can be assembled without even looking at the instructions. You mainly need the instructions to determine which screws go where (which isn’t extremely clear…there is no labeling on the screw bags themselves, or pictures of the screws the instructions reference to use)…but it really isn’t that hard to figure out; you have the Cage Nuts & Screws, the included Allen and Torx-bit Driver, the Torx-head Screws (which are used for almost all of the build), Eight Alan Bolts with Washers (used for Attaching the Cross Braces to the Side Panels), and another bag of small screws which (for me) seemed to be duplicates of ones that were already partially installed for the Plastic Corner Caps.
If you are not going to use a cordless torque-driver to assemble the case, and are going to assemble it by hand, I would recommend wearing padded leather gloves while screwing in the Torx-head Screws. The Torx-head Screws are somewhat “self tapping” (the holes they go in are not threaded, and are a bit smaller than the screws), thus it takes quite a bit of torque to get them in, and flush. The included Torx-bit Driver will tear up your hands while doing this if you do not wear gloves.
You will also need to wear gloves, and use an adjustable wrench, when adjusting the Nuts on the Adjustable Feet prior to installation.
I did not assemble my cabinet in the order the directions specified, but as follows:
1. REMOVE THE KEYS FROM THE INSIDE OF THE SIDE PANELS.
2. Attach the Casters.
3. Attach the Adjustable Feet.
4. Lock the Casters, and lean one Side Panel against a wall.
5. Attach the Bottom Cross Braces to the Side Panel leaning against the wall (blade/fin goes in).
6. Attach the other Side Panel to the Bottom Cross Braces (already connected to one Side Panel).
7. Attach the Top Cross Braces.
8. Attach the Top Panel.
9. Attach the Plastic Corner Caps to the top and bottom.
10. Attach the Bottom Panels (3).
11. Attach the Front and Back Panel Doors.
12. Done. Drink a beer. 😉 Cons: Torx-bit Driver:
The included Torx-bit Driver is REALLY hard on your hands to use (leather padded gloves STRONGLY recommended).
Foam Inserts in Wire Feed Slots:
The Wire Feed Slots have a slitted foam insert to allow cabling to easily be passed in/out from the cabinet, while also keeping out as much dust as possible. This is nice in theory. However, the foam rips easily, and is easily destroyed, if not carefully feeding a cable (like a power-cord) through the slitted foam insert. It would have been (would be) a lot better if these foam inserts were/are replaced with overlapping rubber flaps instead. 😉
Dell Rapid Rail Kit Installation:
I would NOT recommend purchasing this Cabinet if you are planning to use Dell’s Rapid Rails WITH the Wiring Harness Cage attached; I’m pretty sure IT WILL NOT FIT! The Rails BARELY fit without the Wiring Harness Cage (I used a Dell PowerEdge 2950 Rail Kit).
If you are planning on using this cabinet with a set of Dell’s Rapid Rails, there are a few things you must do first:
1. You MUST move the Front Rack Posts (and Cage Nuts) forward as far as possible. This will still only give you about 1/2-1″ of clearance between the back end of the Rail and the Back Panel Door.
2. There are two round bolts, (which kind of look like a “T” from a side-view) on the Rack Post side of each rail, which protrude out far enough to prevent the rails from being installed without removing them. Remove them. 🙂
The rails will install after the two “T” bolts have been removed from each rail, but not without a little bit of effort. The rails also have a Rubber Tab, on the Rack Post side, which will be pressed inward a bit during installation. There appears to be no damage, or reason for concern with the pressure on these rubber tabs, it’s just an annoyance. 🙁 Overall Review: All in all, I would definately recommend this product, and will use it again. 🙂
BRANNAN B. –
Pros: Although not as sleek as a Dell cabinet, these are great looking. Well made. Have good build materials. And a Lifetime warranty. The actual Rack Posts (4) are designed for use with the “universal” Cage Nuts and Screws (a bag of about 10-20 are included), which is very nice. Cons: In addition to my previous comments, I would like to add the following:
TEMPERATURE
Even with only ONE Dell 2950 Server, and ONE UPS, the server reports an internal temperature of 115-125* F! As soon as the Front Door is open, or removed, the server returns to a normal operating temperature; about 77-79* F.
StarTech’s Customer/Technical Support told me they don’t make any fans specifically for this unit, but said a lot of their customers (which means these temperature problems are wide-spread, and well known) have used their 12cm AC Fan Kit (ACFANKIT12) to cool the unit. The Rep told me that their customers attach them to the top vents somehow, even though there are no actual places to mount them. The best way I can see doing this is by;
1. Getting 2 Fans ($100-140)
2. Getting a Sheet of Acrylic to mount the Fans (and block the open portion of the vents) ($20-30)
3. Getting the nuts and bolts to secure the Fans to the Cabinet ($10-20)
This adds $130-190 (in parts) to this cabinet, making it about a $630-700 (depending on shipping, $140 from StarTech). I’m not sure if this is make it worth it, seeming that you can get a Dell 2410 or 2420 for about that same price (search Google).
I also asked the Rep if I could just replace the Front Door I had, with another Back Door. The Rep told me they don’t have spare parts to sell me separately, and seemed unwilling to offer any other real solutions to their (obvious) engineering design flaws. Overall Review: After everything, and after the lack of willingness of their Customer/Technical Support to help resolve the temperature issues, I’m not sure I can honestly recommend this product to anyone, nor will I EVER use it again.
Robert K. –
Pros: Aesthetically pleasing, nice glass front, easily built. Cons: SCREWS: the screws are not standard a M4, M5, M6 and they are unique to this cabinet.
The screws that come with it are all allen and hex tip. Why they didn’t come as standard phillips is beyond me, not sure how many tech’s I know that cruise around with an allen wrench or a hex tip in their bags. I am sure they think they did this for security reasons, but that is why I ordered a case with locks on the doors. I am dealing with several devices and several servers, I would prefer to use a standard tip drivers/drill like I do with my Dell cabinets.
LOCKS: The front door and side doors are separate keys?! It should be ONE key for all locks on the cabinet. Overall Review: I was given a used cabinet and paid for it as if it were new. I didn’t realize these significant problems until the cabinet was almost complete- I’m in the middle of a server project and can’t stop, break the cabinet down and ship it back. So I dealt with it, but I will never buy this product again. The problems I have are:
-Missing screws and bolts (last customer that obviously returned it, didn’t put all of the screws back. I was missing the pack of screws for the castors (wheels). Which is the whole reason I bought a quarter cab, so we could move it around…
-M5 screws for castors weren’t standard M5’s- I went to buy a pack of M5’s and they didn’t fit. I went back and bought 10-32’s which is the standard fit for an M5 and those didn’t fit either. I had to buy some nuts to keep the castors on and will just have to check on them every so often.
-Bent Rack/Rail Ears
-Scratches on corners and plating
David I. –
Pros: good ventilation, clean appearance, sturdy construction, ability to use casters or fixed leg base Cons: none so far.
Anonymous –
Pros: Would have worked great, but did meat the clearance height for the premade furnished desk built into the wall in my two bed room hybrid community apartment and I couldn’t swap spaces with my mini-fridge. Therefore, I had to cancel or return this order. Cons: None
David F. –
Pros: Quality unit, versatile, good price. Mesh all around allows good airflow. Cons: May not be deep enough for servers with cable management systems. Overall Review: I purchased the 18U 31″ deep rack with mesh all around, no glass. I have the rack in a small 70 sq ft closet with a dedicated air conditioner, but even so, I wouldn’t consider a glass door because of the issue of heat and air flow.
I am using this rack with a SAN, a 1U rack server, and 3 UPS’s. Eventually it will have 5 UPS’s, 3 1U servers plus the SAN, and will still have a few slots left.
One concern I had, which turned out to be valid, is the 31″ depth. My server (Dell R440) is about 28.5″ deep. The issue, however, is the server’s rail kit. I had to move the rack mounting rails out 1 notch short of their deepest position. I am able to close the doors, so it does fit, BUT I cannot use the optional Cable Management Arm (CAM), as this adds several more inches. If I want to use the CAM, I’ll have to remove the rear door. This isn’t a security issue for me, but might be for others. Since my setup is pretty small, I will not be using the CAM. If I need to slide out a server, I would shut it down first anyway. So, FITMENT of your gear is very important to pay attention to.
As for the rack itself – it arrived bolted to a wood palette, and had heavy duty cardboard and reinforced corner protection. It was in perfect condition. The fit and finish of the rack are top notch. Smooth edges, nice black finish, and very easy to work with. High quality hinges, locks, and wheel casters. It’s very versatile, you can not only remove the doors, but also reverse them so you can open from either side. Removable mesh side panels are present also.
I would have preferred a deeper rack. I was looking at the StarTech 36″ unit, but it had a glass doors, so that was a deal breaker.
For this size rack, I couldn’t find anything else comparable. And I think it’s a good price for what you get.
Anonymous –
Pros: Easy to assemble
Product is well made and looks good Cons: Some threads not usable, causing cross-threading when trying to install, this was more true of the height adjustment bolts on bottom. Overall Review: I would suggest this item to others looking for a good half rack
Anonymous –
Pros: Just the right size, with free shipping I could not beat the price. Easy to assemble and adjust the rails for long server configuration. Some a assembly required, but easy and the tools needed were included Overall Review: Highly recommended for someone needing a 12U rack.